Do you still put a lot of time and effort into securing your layers of fabric with pins? Then you should take a look at this tutorial, in which we explain how you too can sew your pattern pieces together easily and quickly without tedious pinning.
Instead of using pins, you can also work with the so-called snaps or pinches. This means small markings on the pattern pieces. In the patterns, you can see them as short lines that run at right angles to the cut edge.

These markings are usually transferred to the fabric through small incisions, hence the name Knips or Zwick. Use the tip of a pair of sharp scissors to cut (snip) just a few millimeters into the fabric inside the seam allowance.

With this method, however, it can quickly happen that you cut too far into the fabric. In addition, the marking (especially with stretchy fabrics) is not very precise because the incision gapes.

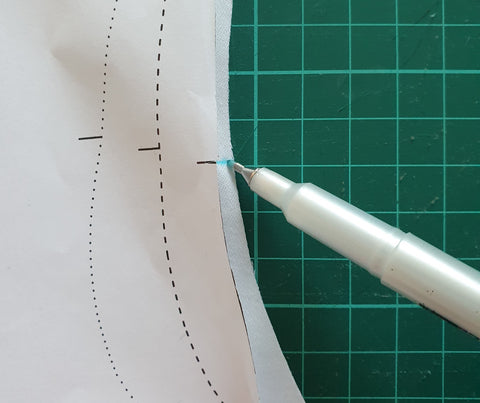
We would therefore recommend that you draw the snaps into the seam allowance with a water-soluble textile pen instead of cutting them.
Snaps have several functions. On the one hand, they serve to control the length. For longer stretches or curves, the snaps show you where your pattern pieces belong together. That way it can't happen to you that you pull one part longer than the other. So you don't need to pin your pattern pieces together beforehand, you can only use the snaps for orientation: simply place the two fabric edges flush under the sewing foot at the beginning of the seam. Then sew an inch or two, leaving the needle in the fabric.


Now you can sort your layers of fabric so that the edges are flush and the first snaps meet. Sew up to this first mark. Once there, you put the edges back together until you reach the next snap. Continue like this until the end of the seam.


We show the example here on an overlock, as it is easy to accidentally warp the fabric, especially with elastic materials. Of course, you can also work this way on a normal sewing machine.
Incidentally, a snap does not necessarily have to meet another snap, but can also match a seam. For example, the knick at the highest point of a sleeve usually hits the shoulder seam.
The snaps can also help you to assign the pattern pieces correctly. For example, to sew in the sleeves the right way around, there are snaps on the sleeve head that show you which side belongs to the front piece and which side to the back piece. Most often there is one knips on one side and two knips on the other, or there is one knips on one side and none on the other.

Now and then stretches of different lengths have to be sewn together. In these cases, the snaps show how far one pattern piece has to be stretched or gathered so that both pieces fit together perfectly.

For example, the sleeve cuff must be stretched when sewing it on so that the snaps meet. The cuff is shorter than the sleeve hem so it doesn't sit too loose on the wrist.
Finally, there are snaps to mark folds, darts or hem allowances.
Taking snaps is definitely worth it! Have fun sewing without prickly pins!